In Life

3 Ways to Bring Spring Indoors

I am actually one of those people who like winter. I love to see snow softly falling against a backdrop of winter trees. I love to curl up by the fireplace with a good book or movie and watch the snow swirl around outside. But after a few months of it and when “the melt” starts to happen and turns that beautiful white snow into a pile of brown, muddy nastiness, I’m ready to see some leaves push through and turn my world green again. Ideally we would go from pristine snowy landscapes to lush green with floral blooms everywhere! But alas, that won’t happen in Ohio. And so we push through and wait for that first blade of grass or that first bloom of a hyacinth or forsythia to spring to life. And until then we just have to simulate it in our homes and will it into existence just a bit sooner! Today I wanted to share 3 ways to bring some spring into your home and get a jump on the season…

1. Style a sitting area

H02
Have you ever shopped your own home? Walk around the house, pull pieces from other rooms, choose bright colors and cheerful accessories and spruce up a plain corner. I have a relatively new settee in the front bay window that I haven’t focused on much. I move it out of the way when we put the tree up and once that’s gone, I toss a few pillows I like onto it. But for spring, I pulled some brighter pillows from another room, added a rug from our bedroom, and pulled in a lamp from another room in the house. Et voila! …a cute as a button nook to listen to music and welcome spring.

Before

Before

After

After

H04

H05

H06

2. Channel nature and Easter

H08
Easter is the main holiday in spring (other than St. Patrick’s Day!) and elements of the holiday can take center stage when thinking spring in our decor. For example, a little Spanish moss draped onto simply stacked grapevine wreaths remind me of a bird’s nest so it’s fun to add some speckled eggs (these are plastic) and why not a green “moss-covered” bird! I wanted my little bird to rest on something higher up and found these candle holders at the craft store for 90% off but definitely not my style. Spray paint to the rescue in a little antique bronze covered them up beautifully and now they look like metal candlesticks! Balancing with a bronze metal church candle holder I bought years ago, Easter can subtly be represented.

Before and After

Before and After

DSC03644

DSC03638

H13

H12

H14
I am not normally a fan of fake greenery but in March in Ohio, fresh is still hard to come by (at least from my yard!). I wanted to keep with the elements of nature, so I used an inexpensive grapevine wreath and attached a ranunculus garland that hints at the real thing. And a few picks in simple glass bottles found at Target can also pass as real until I can find spring in my yard. 🙂 I fashioned a bow out of some gray ribbon I had and wired it to the wreath.
H15

H16

H17

H11

3. Add some “springy” wall art!

K1
I’ve been wanting to make this wall art project for awhile – a frame with chicken wire behind a letter. I found an inexpensive unfinished frame, spray painted it white, and attached chicken wire to the back with a staple gun. I used a cardboard letter “K” that I spray painted with my favorite antique bronze color and also stapled it to the chicken wire. And then I wanted flowers. At first I attached some Dollar Store flowers that I thought would give it the pop of color I wanted for spring, but they just looked too cheap (alas, my fake greenery dilemma).

Dollar Store flower fail

Dollar Store flower fail


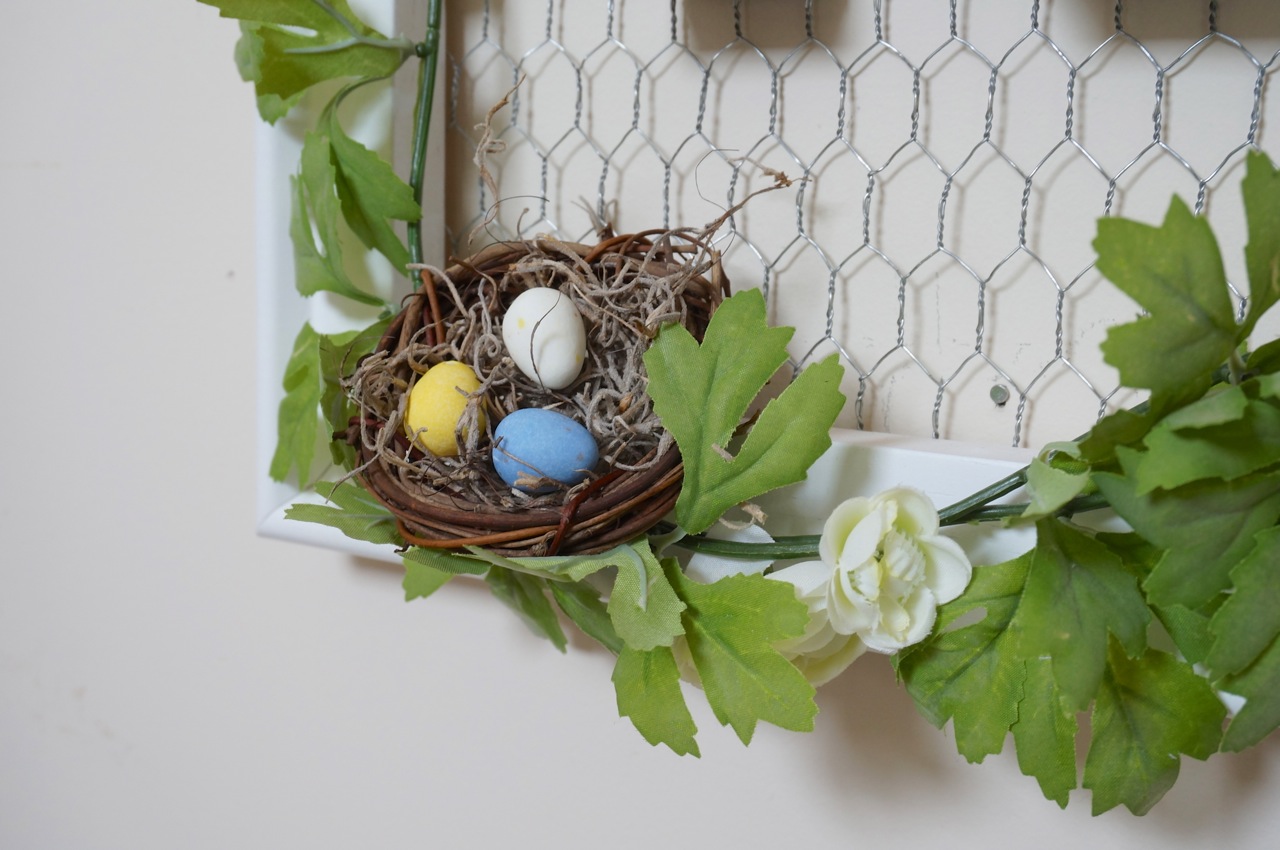
So I decided to just simplify with a little leftover greenery from my wreath and my sister gave me an idea to add a little bird’s nest here (made from a tiny grapevine wreath and Spanish moss). But what to do for tiny eggs? Aha, Easter candy to the rescue – yes, these are chocolate Cadbury mini eggs! Because I may want to re-purpose this frame in the future, I just threaded the greenery sprig through the chicken wire and rested the nest on top. Hung in my front entry way, I love how it just hints that spring is on its way!
K2

K4

K3

K5

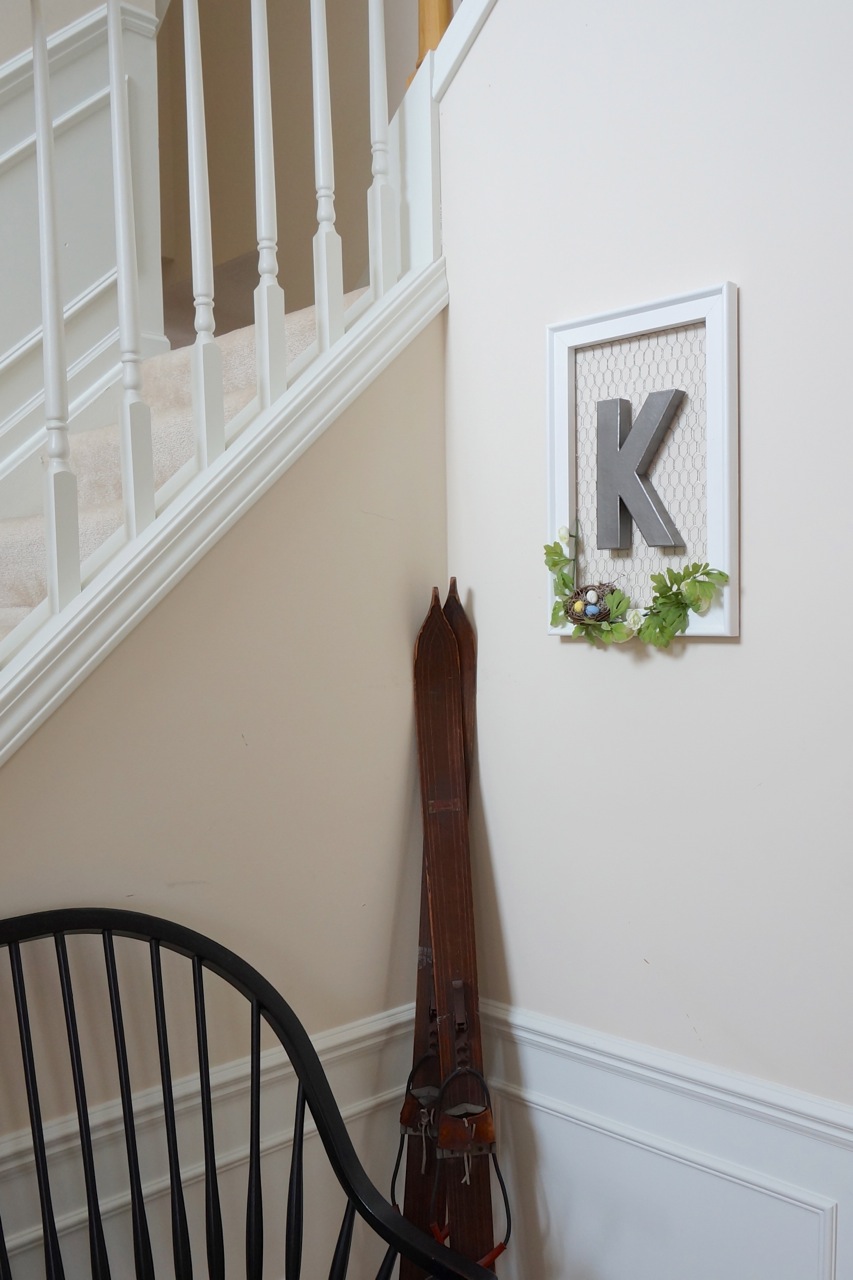
This wall art idea is so adaptable, I could hang it on my front door. I could prop it on the mantle. I could swap embellishments with something beachy for summer. I could add a ribbon/bow. Let your imagination go and vary it how you like!

And there you have it – three ideas on how to bring spring indoors in your home.

Happy decorating!

In Food

Paleo (Or Is It?) Granola

In January, my husband and I embarked on a 21-day Paleo Diet Challenge – no sugar, no grains, no dairy, no alcohol; only vegetables, fruit, and lean meats. We did pretty well and only cheated a tad (mostly because I just needed a little red wine!). And we felt great – our bellies got flatter, we had more energy, and just felt good, all in that short of time! I realized that it is a way of eating that I can follow pretty well and have sought out recipes and variations that we can include in the mix. One difficulty I have with the paleo diet is breakfast. I mean, who can eat eggs or meat every day. It is extremely difficult not to reach for a piece of toast, a pastry, a bagel, a bowl of cereal … granola!
DSC03273

But now, I’ve found a recipe for paleo granola – inspired by Paleo Cupboard that is fantastic! Serve it with a little almond milk or coconut milk and you have an option for cereal that will blow your paleo and non-paleo mind. I don’t think I can eat any other granola after having had this recipe! It really has the perfect balance of sweet to salty with the raw honey and delicious fresh ground pink himalayan sea salt. I will say that this recipe uses raw honey, which is probably not permissible on the paleo Whole30 plan. And because it is granola cereal in concept, purists would still reject it. But I’m thinking it’s an acceptable recipe to include in the mix of a mostly paleo diet – and it is 300% times better than any store bought cereal or granola available.
DSC03277

This recipe also doubles as a snack in place of granola bars. You could technically form it into bars, actually, but I prefer to break it into clumps and store in a jar for easy snacking. Just don’t eat too much – it does have a lot of calories with all of those nuts!

INGREDIENTS
1 cup raw almonds
1 cup raw cashews
1/4 cup raw pepitas/pumpkin seeds
1/4 cup raw sunflower seeds (no shell)
1/2 cup unsweetened coconut flakes
1/4 cup coconut oil
1/2 cup raw honey
1 tsp vanilla extract
1 tsp pink himalayan sea salt
1 cup dried cherries
DSC03257

DIRECTIONS
1. Preheat oven to 275 F. Place the almonds, cashews and coconut flakes in a food processor or blender and pulse a few times to break into smaller chunks.
DSC03260
2. Microwave the coconut oil, raw honey and vanilla extract together in a medium sized mixing bowl for about 30-45 seconds. Add the seeds, nuts and coconut flakes and stir to coat.
DSC03262
DSC03264
3. Spread the granola mixture evenly onto a baking sheet lined with parchment paper and cook for about 20-25 minutes or until lightly browned, stirring once or twice.
DSC03265
4. Remove from heat and add the dried cherries and sprinkle with sea salt, pressing the mixture together to form a flat surface.
DSC03266

DSC03271
5. Allow to cool for about 20 minutes or until hardened, and then break into chunks and enjoy in whatever form you like!
DSC03275

Bon Appétit!

In Life

Zen and the Art of Calligraphy

I took a class the other day. It was a calligraphy class taught by a most talented person, Farin Blackburn of seaworthi, at a beautiful space – Lovely Paperie and Gifts in Rocky River (with lovely owner, Kate Fortney). I have never thought of myself as someone capable of calligraphy as I have terrible handwriting. The computer has become my haven as I learned that I type faster than I write. But my niece is getting married and invited me to join her at this class to get a taste for the technique.

Photo Feb 19, 8 32 25 PM
Photo Feb 19, 6 30 30 PM
Photo Feb 19, 6 31 35 PM

What is calligraphy anyways, you might ask? Calligraphy is the design and execution of lettering with a broad tip instrument or brush. The word is derived from the Greek words for ‘beauty’ and ‘writing’, and that’s exactly what it is. You can do calligraphy with fountain type pens with different tips or nibs and wet ink as we did in class or you can use markers especially made with a wider edge to simulate the fountain pen or even a paintbrush.

Calligraphy 101

Photo Feb 19, 6 30 37 PM

Photo Feb 19, 7 53 02 PM
I have always loved calligraphy as an art, as a medium, as a form of communication. It serves all design principles equally it seems to me. In the age of computers, it is possible to simulate the look of hand-lettered calligraphy and while that presents a certain amount of ease, there is nothing like custom hand-lettering and the effort and skill it takes to do it well. If you remember, it was a calligraphy class at Stanford that influenced Steve Jobs and Apple computer to bridge the gap and make typography and font options a focus of Macintosh computers – most likely something we would not have today without his influence.

Mac
Calligraphy in its original form is popular as ever, with handwritten invitations sought after by soon to be brides and commercial entities alike. In this era of handmade crafts, a handwritten note is special – a handwritten note or invitation using calligraphy is divine and may be collected or even displayed. As accomplished French calligrapher, Nicolas Ouchenir” says “it’s so classic, it becomes ultra modern”.
Nicolas Ouchenir

But calligraphy as a skill takes patience and persistence and practice… all of which are a struggle for me. Yet, as I’ve been trying to perfect each stroke of pen to paper, I find myself getting into a space of zen and I can see that this may become a new form of therapy. I have a long way to go in my technique and ability, but I’m glad I tried the class and highly recommend it to others. It was $125 for 2 hours of instruction and materials (plus snacks/drinks) – follow Lovely on Facebook for upcoming schedule of classes.

For more examples of calligraphy styles and techniques that I love, take a look at my Pinterest board on Calligraphy and Typography:


Photo Feb 19, 8 31 37 PM

In Food, Life

Romantic Fireside Dinner For Two

I wanted to go out. And I really wanted to specifically go to the Cleveland Orchestra concert where they project the movie, Vertigo, and then play the soundtrack live! But alas, we waited too long to buy tickets and they were sold out. Hubs had a great idea – “why not watch the movie at home”, and I added “and we’ll make a delicious stay-in meal”! Done and done.

Nothing says romance like a fireplace, so I pulled a little bistro table set we have in our basement up to the living room for a special fireside dining meal. I really didn’t want to buy any new tablecloth or accessories, so I repurposed a plaid blanket into a cozy tablecloth. The heart-shaped ramekins added the right touch/color to our table.
Photo Feb 13, 5 36 07 PM
Photo Feb 13, 5 38 19 PM

Photo Feb 13, 5 38 37 PM

Photo Feb 13, 5 39 23 PM

Photo Feb 13, 5 36 44 PM

Photo Feb 13, 5 37 07 PM

Photo Feb 13, 5 41 22 PM

The Menu

We have been on a Paleo kick recently so I knew I didn’t want excessive carbs for our special meal. I decided on filet mignon with roasted asparagus for the main, champagne to start, a special bottle of wine, and chocolate for dessert! Yes, chocolate and wine were required and not Paleo. 🙂 I only buy meat from our local Heinen’s and found two perfect grass-fed steaks. It’s okay to splurge when you’re dining at home – it will still always cost less than a restaurant! Heinen’s had delicious chocolate cake by the slice, but I also made a pit stop at Malley’s (oh yeah) and bought chocolate covered strawberries for a particularly decadent treat.

The Drinks

The champagne was really a bottle of brut rosé sparkling wine from Two Sisters Vineyard in Niagara-on-the-Lake, Ontario called “Lush” that came in this beautifully gold and pink labeled bottle with gorgeous packaging – perfect for romance! And the wine with dinner was a delicious bottle of Silver Oak Cabernet Sauvignon that Hubs got me for Christmas – taking us back to our time in Napa Valley last year, yum.
Photo Feb 13, 2 26 34 PM

Photo Feb 13, 5 54 15 PM (1)

Photo Feb 13, 7 07 55 PM

The Dinner (or “how to cook filet mignon at home”)

Hubs was tempted to grill outside, in the cold, in the snow. But I said “no, they will be delicious made on the stove”. Here’s the key…butter and a hot grill pan. Take the steaks out of the oven 30 minutes before cooking, lightly dry with a paper towel and season with salt & pepper (or Montreal steak seasoning, as we like it). Preheat oven to 400F (this will be for the asparagus and to finish the steaks). Pop the asparagus in the oven about 10 minutes before you start the steaks. Heat an oven-safe grill/sauté pan on the stove until very hot (I used a Le Creuset cast iron grill pan). Add a tablespoon of butter for each steak and let it melt. Btw, I’m convinced that the butter I used – grass-fed pasteurized organic butter – also made a difference. Place the steaks on the butter to sear for 2-4 minutes on each side (these were 4 oz filets, so 2 min/each was enough). As the steaks are searing, tilt the pan and baste them with the melted butter several times, oh yeah. Once the sear is done, put the pan in the oven for another 2-4 minutes to desired doneness (we like medium-rare, so again we only did 3 min). Remove the steaks from pan to a plate and cover with foil to rest 5 minutes. Remove the asparagus from the oven and plate with the steaks. Oh my, bon appétit!
Photo Feb 13, 7 13 13 PM

The Dessert

Did I mention Malley’s? Um yeah, the box of chocolate covered strawberries is only available this time of year. Yes, I could have made them myself, but honestly this convenience along with the Heinen’s slice of chocolate cake made the meal so much less stressful and enjoyable. And how does romance not include some variation of chocolate.
Photo Feb 13, 8 03 57 PM

The Movie

I love curling up on the couch to watch old movies, especially with the Hubs. Vertigo had actually been on for us to DVR it, so we pretended the Cleveland Orchestra was playing and watched it with our remaining wine and chocolate and the fireplace keeping us warm. It would have been nice to go out but honestly it was perfect to just stay in.
Photo Feb 13, 8 37 53 PM

In Food, Life

Valentine Linzer Cookies

Heart Shaped Linzer Cookies

I have always wanted to make Linzer Cookies. The idea of these delicate confections with a candy-like view of the raspberry jam peeking through the cutout opening and dusted with a light sprinkle of powdered sugar just oozes romance, love and sweetness! What a perfect cookie choice then for Valentine’s Day, especially with some heart shaped Linzer cutters I found at the craft store.
DSC03321
The Linzer cookie origin stems from the Linzertorte – an Austrian dessert from the city of Linz made with a crust including ground nuts of some variety (mostly almonds), filled with black currant preserves, and then topped with an intricate lattice crust. It is most often served at Christmastime. The Linzer cookie is just a smaller version of the torte with two cookies sandwiched together by jam or preserves. If you cut the hole in the cookie round, they are known as Linzer Eyes (Linzer Augen). And you can really use any cutters you have on hand – you just need a larger one for the base and a small one to cut out the jam peekaboo part. At Christmas time, stars can be particularly pretty, but oftentimes simple fluted round cutters are used. I also prefer to use raspberry jam over black currant but you could experiment, just make sure it’s good quality. And the powdered sugar dusting makes them almost too pretty to eat! …nah 🙂
DSC03307
Let’s get started!

INGREDIENTS
2 cups all-purpose flour
2/3 cup finely ground almonds (I used Bob’s Red Mill almond flour)
1/4 tsp cinnamon
1/4 tsp salt
1 cup (2 sticks) butter, softened
2/3 cup granulated sugar
1 egg
1/2 tsp vanilla extract
1/2 cup seedless raspberry jam
confectioner’s sugar

DIRECTIONS
In a small bowl, mix the flour, almonds, cinnamon, and salt; set aside. In a mixing bowl, beat butter and sugar with mixer until light and fluffy. Add egg and vanilla, mix well. Add flour mixture only until incorporated.
DSC03281

Divide dough into 2 pieces, wrap in plastic, and refrigerate 2 hours or until firm.

Preheat oven to 350F. Line cookie sheet with parchment paper. Remove one piece of dough from refrigerator and roll out to 1/8inch thickness. Cut half cookies with the insert in the cutter and the other half without. Transfer to cookie sheet. Scraps can be refrigerated and re-rolled.
DSC03282

DSC03285
Bake 10-12 minutes or until light brown. Cool in pan for 2 minutes and then transfer to racks to cool completely.

DSC03287
Invert bottom cookies, spread with a tsp of raspberry jam. Dust the top cookies with confectioner’s sugar; gently sandwich the cookies together. Makes about 30 cookies.
DSC03293

DSC03290

And now it’s time to share with friends or family and enjoy a beautiful treat for Valentine’s Day!
DSC03317

DSC03320

DSC03313